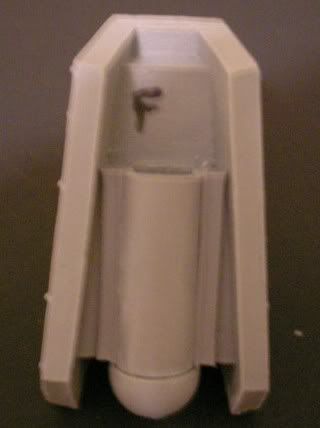
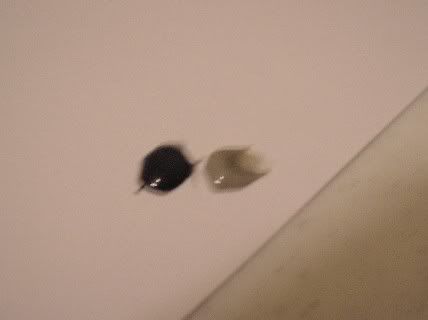
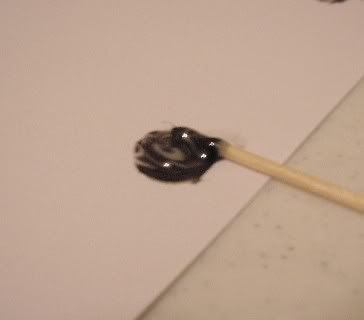
First off is another tip. I ran across a situation and had to use my trusty sharpie marker to bail me out again. There are some resin pieces that have a part number or other designation on them. Such as this one (note the "F" cast in the center).

There is a half cylinder bit that will cover this letter up, forever hiding the important information that is cast in the piece. So, before gluing that piece on I used the marker to replicate the information. So now even with the extra piece glued on, we can tell this part is "F", or 'front'.
Another bit of advice I have is on gluing parts together. As this project goes on I will be using a lot of epoxy. Sure, for small stuff I'll still use the Super Glue. But, for larger pieces I'll be using an epoxy called JB Quick. I love this stuff. It takes about four minutes to cure to the point that the piece is totally secure, but that gives you some working time. It also has another great feature... From about four minutes till around twenty minutes the consistency of the epoxy is such that if you have allowed some to squish out of the joint, you can carve it away with an exacto knife and it will fill any crevice automatically! Here are a couple shots of epoxy in action...
This is a shot of the first piece to get the epoxy treatment. It is an interior view of the leg armor. The bits you glue on the armor to (later) mount it on the legs are a pain. You have to apply glue then hold the piece onto the leg to ensure that the pieces are in the right position. Super Glue drys too fast, so the four minute work time is perfect here. Plus the resulting join will be stronger than the super glue could have ever hoped to be!
As you can see, some small parts are being glued already. These are all minor pieces that are required to go onto the major parts before actual assembly. I've spared you the tedium of explaining every single tiny bit that's glued on. I assure you though, that I will be sharing all the major assembly and any smaller bits that warrant special attention or are just plain cool!
Finally we move on to the dilemma of the base. I've narrowed it down to a couple of options. These are based (ha ha 3d6 pun damage to all readers) on several factors. Playability; how will it work on a game board, will it even fit? Functionality; will it hold the titan up and add at least some stability? I've decided that the pose will be fairly static. I will probably bend one knee a bit, but this thing won't be dancing a jig anytime soon. With this in mind, I bought some MDF board and did some cutting on the band saw and some sanding to bevel the edge. Thanks to my wonderful Dad for having these kind of tools laying around in his garage, even if he does live across town!
This first shot is a two base idea. One for each foot. Minimal 'foot print' (wow I'm punny indeed) but still adding some stability and preventing too much pressure ever being put on one or two toes are the main advantages here...

Then there is the full base option. This adds maximum stability at the cost of being freaking huge. The item at the bottom of the pick is a standard 12" (30cm) ruler. Also worth noting; this is a 14" diameter base, I also made a 16" in case this one doesn't allow enough leg room.

You may notice that I left the feet on the smaller 6" diameter bases in this last shot. A third idea I've had is to use both methods. I could mount the feet on the smaller individual bases, then use powerful magnets to affix those to the larger base.
I'm hoping to get to the big stuff, drilling and pinning large parts, in the next few days. So keep an eye out for another post when that's underway.
Any comments, questions, or better yet suggestions are appreciated. You can even toss in a pun if that's how you roll.
5 comments:
I vote the combo base. Leave the legs on their individual pieces and then make the bigger one so you can set him down into it. Like people do with a large squad scenic base... each individual model's base is made up so it looks like part of the bigger base where they stand on it.
I would watch how strong of a magnet you use though. Just enough to hold the big base to the model not the other way around. Too strong and each time you go to separate the two, you will be adding stress to the joints of your Titan and will end up having to fix something in the future for sure.
Just enough so that when you pick up the Titan to move it, the big base comes with it.
I vote for the single large base.
I'be got a decent collection of old Armorcast Reaver titans up on BoLS and let me tell you, you want them attached FIRMLY to a large wide baseplate.
Titan by their nature are top-heavy, and very expensive to both purchase and detail.
While the smaller individual per-foot bases are easier to position during games, they leave your-baby very vulnerable to tipping over.
In apoc, titans tend to be a focus of games and attract a lot of attention. Folks don't tend to mind if you have to move some terrain out of the way now and then as you move the beast around the table. Better that, than risk damaging the model, or worse yet, not have it involved in the game at all.
I vote for him stomping on a tank! :P
I have to say, I'm totally stuck on the idea of the magnetized combo base: I feel quite attracted to the idea; although I appreciate Bigred's viewpoint is the polar opposite. Mind you, he's better versed in the field of large-scale models than I am. Ha! Typical. I'm solenoid with myself for always being wrong in these matters -I always torque too much! Damnit!
Hmm. I feel better now. That's a lode off my mind.
Ahh...that's enough of that: I'm off to bed.
- Drax.
I have two of my armorcast titans based, a reaver and a warhound. For the warhound, I went with a single oval plaque wood piece from Michaels craft store, it works GREAT as a single base, and the warhound is not too big that the base interferes with Apocalypse terrain. For the reaver, I used the same ovals, one for each foot, positioned so that troops or rhinos can pass underneath. The ovals were positioned FRONT-TO-BACK lengthwise, because you do not need side-to-side stability, you need front-to-back stability, and positioning ovals like big clown shoes gives him the stability he needs. Titans always fall forward or backward, and mine has NEVER fallen in a game since giving him his clown shoes, and yet I can still straddle friendly troops, terrain, etc. My very strong suggestion is to go this route even if you use a larger magnetized show base. You really can have the best of both worlds!
Rogue Trader Maitreya
Post a Comment