Wednesday, November 12, 2008

My Latest Project ( completely off topic!)

I've been absent from the blog scene for almost a month now. I'd like to say that I've been off busy feeding the hungry or curing cancer in that time, but my time was spent much more selfishly. I was working on passing a huge kidney stone and recovering. What follows is a tale of my trip through hell.

A little history... I had my first kidney stone about ten years ago. Withing 8 hours of the excruciating pains beginning, I had passed a small stone that looked like something off a sticker bush. My next stone was about two years later. Another small stone, but while it was thankfully smooth, it hurt just as bad and took about forty-eight hours to pass.

A couple years after that, I'm in the emergency room again with another kidney stone. This one hurt for about five days and it never did seem to come out. Every year or two since then I would have to go the the emergency room in extreme pain, but nothing ever came out. I was told about five years ago that I had a decent size stone just about to drop into my bladder. This sounded great because once they get to your bladder, they don't hurt anymore. The problem, by the way, with kidney stones is pretty much all in the getting from your kidney to your bladder. A year later I was told that this was probably a different stone, but what do you know, it was still "just almost into your bladder".

A year ago I went into the emergency room and they did an MRI and said (you guessed it) I had a pretty big stone, but it was almost into my bladder, "it should pass fine". Now we come to this year. I went to the same ER as last year. The Dr. compared this years MRI to last years and said basically, "WTF"? It was the exact same stone... I told him of course it was, I haven't actually passed a stone since 2001. He had no idea why the Dr. last year didn't send me straight to a urologist? The stone, according to the MRI from this year and last, was over 6mm in size. Generally anything under 4mm is expected to pass. Anything over six millimeters is pretty much impossible he told me. So, since I didn't have a blocked kidney (so no emergency procedure) I had to live out the next couple days on pain pills that didn't really work until I could see a urologist. I convinced him that I could not live in that kind of pain for a week until he could do something, so he managed to bump me up in line for a Lithotripsy procedure. So a couple days later I go to the hospital and they put under and shoot sonic waves through me and try to bust up the stone into smaller passable pieces. This was more important than ever because the flat x-rays had shown the stone to be closer to 10mm! I go home to recover and have less extreme pain, though still a bit of discomfort from the procedure (though not invasive, it's quite jarring to your innards). A week later I go to follow up with my Dr and he has me x-rayed again... great news... the stone didn't break up after all, the Lithotripsy just sonically knocked it down into my bladder. My Dr had a look on his face that you never want to see you Dr have and said, "I don't know if you can pass that... I don't know how it ever got into your bladder". But, he said I should give it a shot and if nothing came out he'd go in after in a month or two... ew. Well, almost a week later and started having pain when going to the restroom. I'll tell you that the last few inches a kidney stone travels is usually painless, a short break in the stream when you are peeing and there it is. This took all day to come out and hurt like hell.

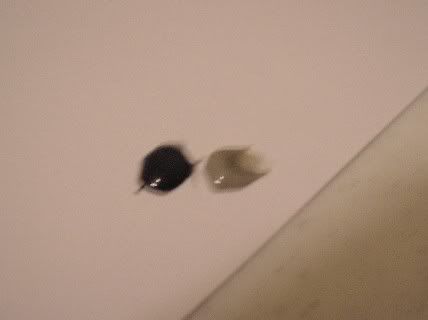
After trying to come out for years, I present to you, the stone.


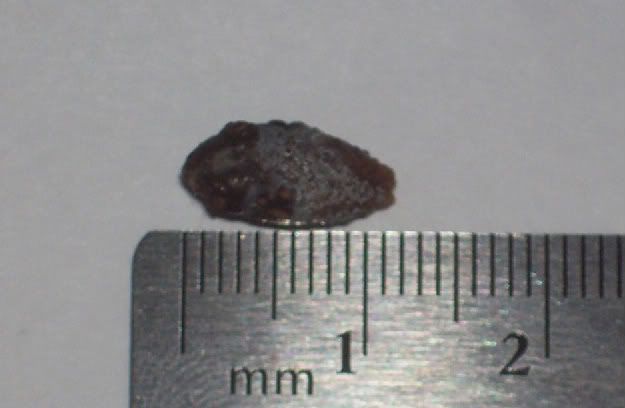
Yea, close to 13mm! And they said anything over 6mm wouldn't pass, ha! I win! Inner Geek 1, Stone 0! In your face tiny hell-stone!


On another off topic front, my darling Inner Geek Lover has been to the Dr and it appears she is with child! I'm not sure how this happened, but I'm it's all quite medical. We are very excited as she was told previously by her physician that she could not have any more children. Look for another off topic blog on or about the 27th of June next year!

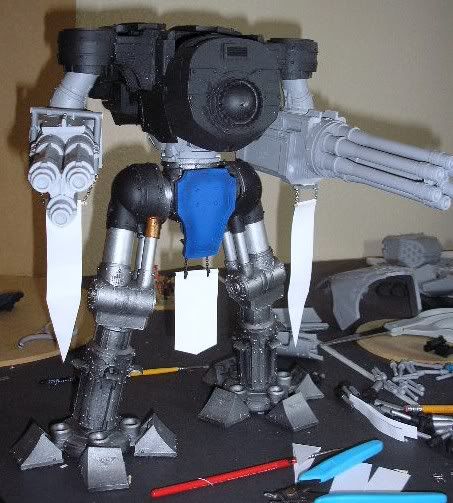
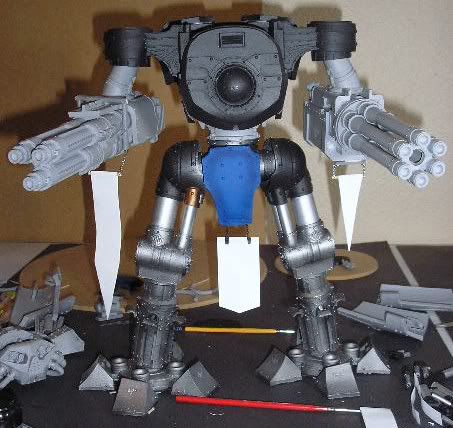
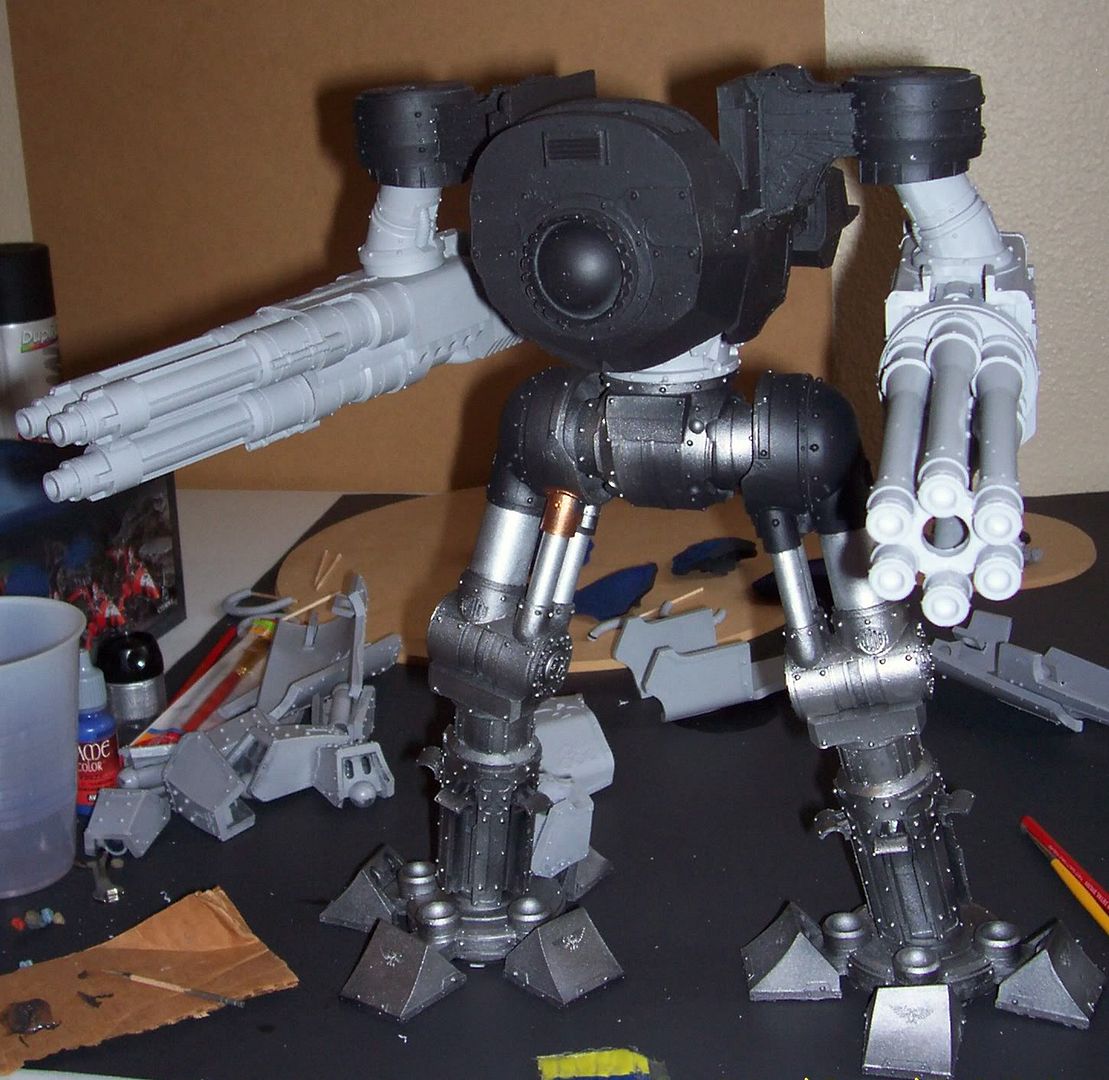
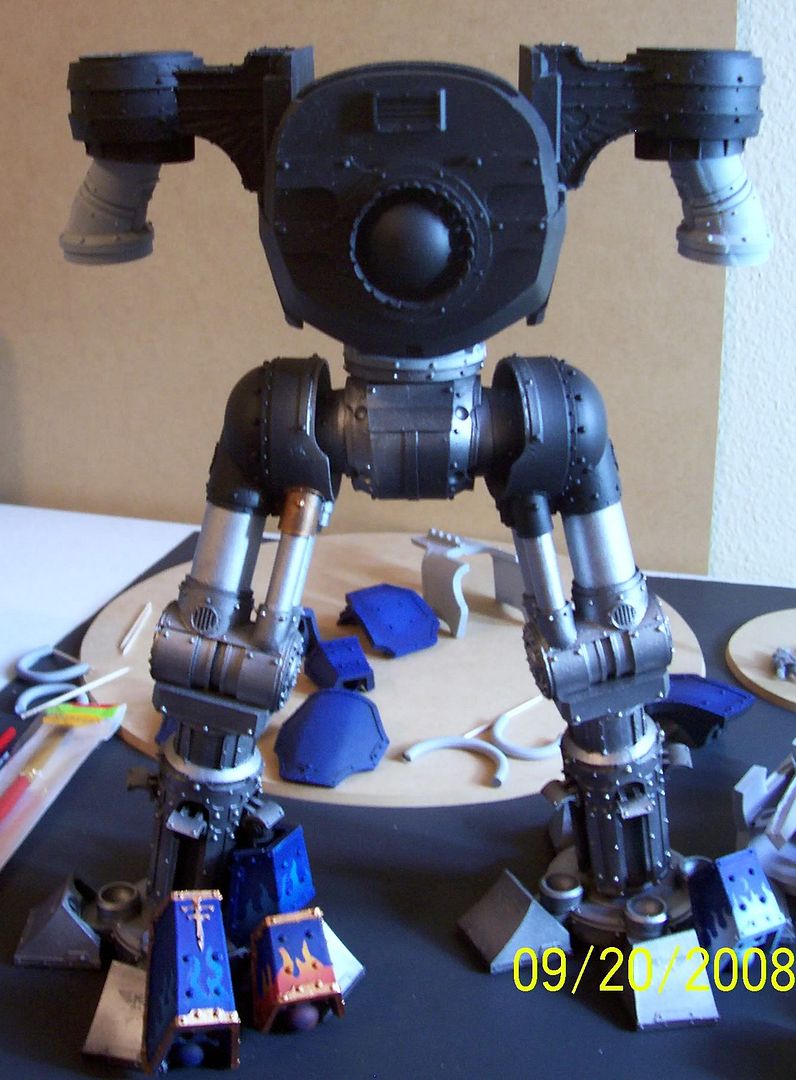
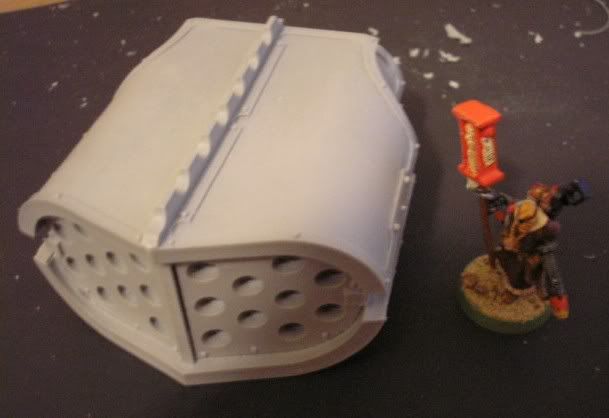
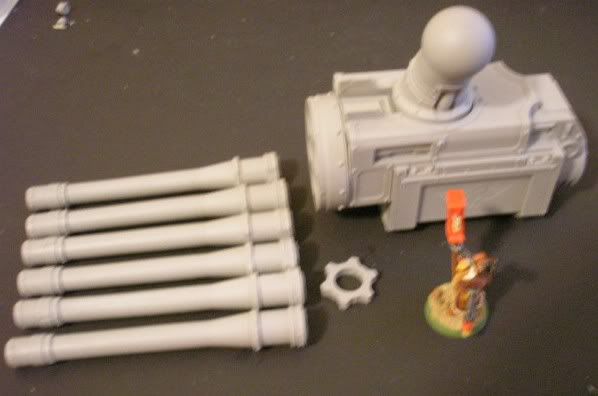
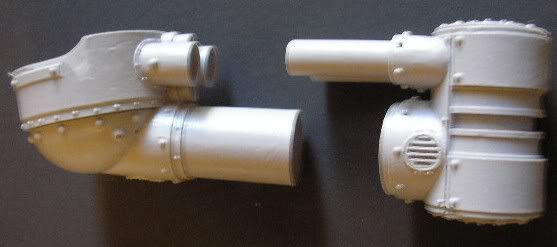
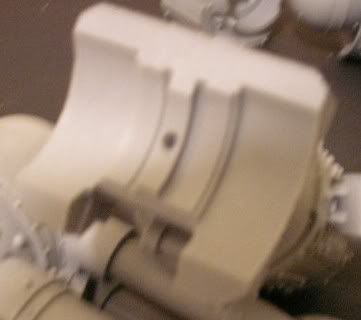
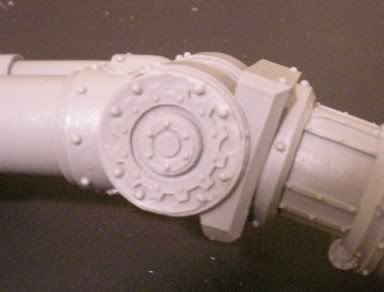
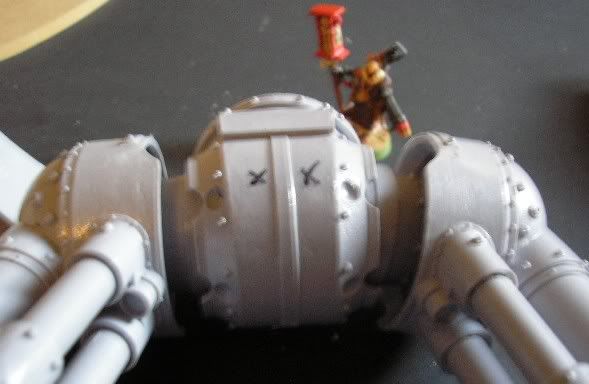
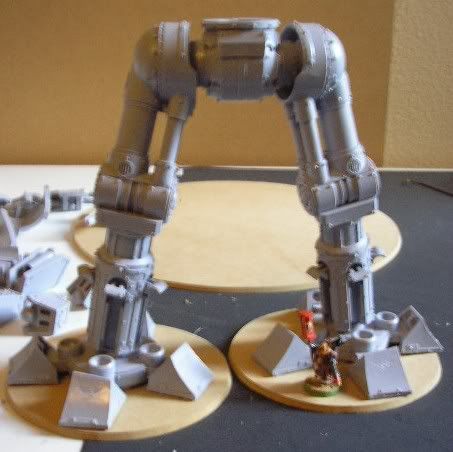
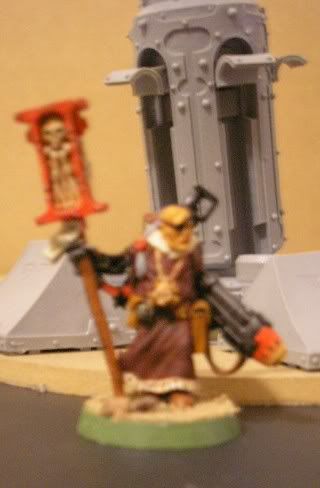
Thanks for stopping by. I appreciate all the folks who read my blog and I promise you, work will be starting up again on the Reaver. Between recovery and trying to make up for lost time where I work, I've had no time for the beast. I've little chance of ever catching up completely on all my friends blogs, but I'm going to give it my best. I'll talk to you all later!

Saturday, October 18, 2008

Reaver Titan Pt 10 (Banner Mock Up)

Finally another update! I'll say it so you don't have to... but you can.

I've been working on ideas for paint schemes and think I know what I want to do. However, I have to figure out banners first, because I'm going to embed magnets in the Reaver to hold the banners. This is for two reasons. Number one, in the fluff, banners are usually removed before going into combat, they are more for parade ground and public appearances. Second, I can remove them during transportation and games to help ensure that they stay in good condition. In the following pictures I've rigged up magnets to do a sort of dry run of how the banners might sit... er... swing? What I'm really looking for is some opinions.

So let's get to the pics!

These first two shots are the banners and sizes I'm favoring right now. The weapon banners are long and, I think, dramatic.


Now, I've been looking through Imperial Armor Six and the Reavers pictured therein have a small banner on one arm and just a large purity seal looking banner on the other. I know from looking at theirs that I don't like the purity seal banner. But, to be fair, I've done a dry fit with one of their style of small banners. Here is a pic of the Reaver with one of each Weapon Banner. What do you think?


Admittedly, the longer banners may touch/rub the outer leg armor, but I don't think it will cause it to look awkward based on what I've seen here. Plus, there may be some billowing affect on the banners that make them miss the legs altogether.

The center banner I'm happy with as it's shown. The size and shape are taken from the Imperial Armor Six book and I think it will look fine, though you may certainly voice your opinion on that one too!

As to what may go on the banners, I will base them loosely off the banners in the book. Kill markings, maybe some other esoteric symbols, and unlike the book I'm thinking of naming the weapons in which case the names will be on each weapon banner. I'm also hoping to get Ron over at From The Warp to get the banners designed and painted for me. Ron is a Banner Ninja!

That's it for this time, sorry for the small post. Once I get these magnets mounted and I can finish priming, I think things will pick up a bit. Thanks for stopping by and be sure to leave a comment and let me know what you think... it doesn't even have to be in the form of a haiku, though you'll get extra points if it is!

Tuesday, October 7, 2008

Imperial Armor Six is here!

The book has finally arrived! I've not read it all the way through yet, though I've skimmed the Titan bits and have a good start on the, "Fluff Section". I will share my initial thoughts though for those interested.


The quality of materials seems fairly high. The only physical problems upon arrival are very slightly dented corners on the hard cover, most certainly from shipping. The box arrived looking like it had spent some time in the trenches of Vraks itself. But, it has that new book smell, and the binding has already held up to being opened more than five times so I'm not complaining!

The quality of editing also seems, sadly, about par for the course. I'd like to take this opportunity to personally offer to proofread future releases. Forge World, call me, I'll work for resin. While what is being said is of high quality, better than some actual 40k fiction in fact, the typos give it a rushed feeling. The word, "we" where the word, "were" was meant to be and several other typos have already shown up and I'm not nearly halfway through the fluff section. We all make typos, I feel bad and go back and edit when I catch one that I let by for my readers. You can bet if I charged you guys to read my blog I'd have the best edited, typo free, blog that no one would ever read! As I've said, the quality of the story is there, I just wish there had been a little more proof reading before the book went to the presses.

The book is full of great pictures. Both the in action war film style and the color plates of armor and paint schemes look great. There are illustrations of markings and other great reference for units. The pictures in this book I give two thumbs up, only because I have no more thumbs to offer.

I'm working my way through the fluff of the book now. I'm hoping to find tidbits of information on the Legio Astorum (also woefully misspelled once in the book so far) as the actual sections on the Legio and Reaver Titans is a little sparse on fluff. There is a great diagram showing all the Engines used on Vraks, with paint schemes and names. This alone has given me tons of ideas on how I want to paint my Reaver.

Overall, so far, my impression of the book is positive. It has the typos we have pretty much come to expect, but this is not enough to ruin a book like this.

Thanks for stopping by and I hope you enjoyed my rambling about Imperial Armor Volume Six. If you have any question about the book or its contents (no I can't scan the entire book for you, sorry), I'd be happy to answer them or watch for the answer as I'm reading the book. Just drop me a comment.

Friday, October 3, 2008

"Titanicus" book review plus news...

I know the book review got top billing, but let's get the news out of the way first.

I've had a rough couple weeks recently. Seasonal allergies were really tearing me up, and when they weren't, the medicine to alleviate them was! So, I've really not got a lot done on the Reaver Titan project. This is not such a big deal as I'm patiently waiting for the new Imperial Armor book before getting too serious about the paint. There will be a quick update on the Reaver at the end of this blog, a bonus for folks who read it even when it doesn't have Reaver Titan Ptx in the title! Also, I am lucky enough to be part of a collaborative product test with Ron over at From The Warp. That's still a little ways off and will be featured on his blog, so keep an eye out for news from him on it!

On to the book review! I bought my copy of Dan Abnetts' Titanicus as soon as I could get my hands on it. I've been reading it like mad the last few days and have just finished it this evening. This is not my first Dan Abnett book, but it is my first titan related Dan Abnett read. I know he wrote some for a titan graphic novel, but I've not had a chance to read that yet, so I can not compare the two at all. Here is a shot of the book...


(look for it, buy it, read it)

All of Dan Abnetts books are great, and Titanicus is no exception. Dan has done a commendable job telling the story of a war from a whole new perspective and scale. As is often the case, he gives you characters to care about... and some will be taken away. There are a couple of minor side plots that don't contribute to the story directly, but do an amazing job of either making you understand the perils of a situation, or the mood of the story at that point. Then, there are side plots that are also pivotal to the story line.

The book also immerses you in the culture of the Cult Mechanicus as a whole, as well as that of a Titan Legion. Just as all of the Dan Abnett books introduce us to a future culture with their own slang words and vocabulary, this one does so with the Mechanicus. I'll give an example without giving anything away. When one character remarks that Macaroth will be "pissed", he is corrected for using the lingo of the "unmodified" as non Mechanicus refer to us. The correct phrase is "Macaroth will be very error shunt abort with us". It's little touches like this that make you feel like you are peeking in on a completely different culture. The Legios have verbage all their own too. I had no idea the word 'Princeps' could be used as a verb, as in "Biggus Titanus is Bubbas' Pricepture", or "Bubba is Princepting that engine".

The Titan Legions featured in the story are the Legio Tempestus and the Legio Invictus for the Imperials. The Chaos Titans allegiance is never made clear. Sorry Chaos fans. There are many descriptions of Chaos Titan names, paint schemes, and general attitudes though. Likewise, there is no shortage of interesting Titan names on the Imperial side.

There is, of course, a political tale within the book. Thankfully, it involves only the sci-fi world of 40k. Much to be learned about the politics of the Mechanicus can be found in these pages. I can't go much deeper on this subject without spoilers, and I'm trying to avoid those.

The book is not without humor. There is a bit of comic relief dotted throughout, but it is used sparingly. There is one interaction between a Legio agent and his three Skitarii body guards that is just hilarious as he tries to help them work out for themselves why violence is not, in this particular case, the means to their end. Not a ton of laughs, but that's not why you read a book like this.

And speaking of the Skitarii! This book makes them sound like an army you'll wish you could play in 40k. Bred for violent tendencies and then rebuilt to cause fear as well. You have to have some serious stones to chase down titans on foot and try to get grappling lines on them for immobilization and boarding! I don't think they're tougher than Marines per se, but I can tell you that the Mechanicus is definitely not sharing all their technology in regards to bionics and lethality.

Only one thing really bothered me about the book, and it may be something that I just didn't understand. But in one battle, one of the main Titans featured in the story is about to be attacked in melee so it charges its energy maul... shortly after (same scene), it's described as letting loose with both arm mounted weapons at a ranged enemy. So, one arm seems to have transformed to an energy maul and back. It's a questionable passage, but not enough to make me error shunt abort.

I hope I've not given too much away, but have piqued your curiosity. This is an excellent book, full of awesome fluff for fans of the Cult Mechanicus and the Titan Legions. I can truly say that I know fathoms more about these two entities than I did before. Good story, well written, I recommend it!

For the small Reaver update...

I've spent some time working on getting the large leg armor plates to fit as they should. There is some discrepancy between the UK right and left, and the US right and left I think. After some major thinking I figured out which armor plate should go where. I still stand by my original word that this model is cast very well. That said, some minor adjusting using a heat gun and boiling water was needed to make things fit to perfection. I also pinned the arms and head. They'll not be attached till after painting, but they are ready for assembly when the time comes. The arms connect at a rotator type joint, so they received two pins each, the head and neck also got the two pin treatment as it's a ball and socket type joint. More little pieces have been glued together where doing so is not inhibitory to later steps. Painting techniques are still being played with on scrap plasticard in preparation for the big paint. I've set a goal for myself to have this Reaver done by the first week of November, though I'd like to see it done sooner. I've also purchased some fine chain and will be experimenting with how I want to attach banners. The arm pins hold the arms on in a dry fit, so that will make banner shape and size design a lot easier. I know it's not a lot that you haven't seen before, but here is a shot of the Titan with the arms dry fit in place...


I appreciate you stopping by and checking out my book review on Titanicus. If you have any comments, queries, or ponderances, leave a comment by all means!

Saturday, September 20, 2008

Reaver Titan Pt 9 (In Color!)

Just a small update this time. It's not a lack of work going into the Titan, simply a lack of the appearance of work going into the Titan.

I've finalized the legs to waist connection this week. I've also added the upper arms and begun to splash some paint about!

The Titans waist is made up of three pieces from top to bottom, Lower Torso, Waist, and Pelvis. The pelvis is, of course, already in place holding the legs together. The waist proper allows the Titan to rotate in the middle. The lower torso is a ball and socket that allows some tilt to go into the mid section. One thing I found was that a lot more of this work could have been done before priming than what I did. The lower torso could be added to the torso without hiding any detail that would later need to be painted. The waist could then be attached to this, still without causing any painting problems later. This would also allow the Reavers upper half and lower half to be dry fit. Here is a picture of the lower torso attached to the bottom of the, already primered, torso... live and learn.


This finishing of the waist allowed me to position the upper arms into the shoulder sockets. This is another of those awesome spots where you can glue first and pin second due to later parts hiding the pins. The upper arms each got two pins to the shoulder, I don't trust a ball and socket joint to just one. I'm sorry there aren't pictures of this process, they came out absolutely terrible so I scrapped them. You can see the arms connected to the shoulders in a picture later in the blog.

As for the color. I picked up an airbrush recently and still have my compressor from about a million years ago. For an easy entry into airbrush land I sprayed the legs from the knee joint down with Boltgun Metal. This went on really nicely, so I got a little more brave. I've been playing with the Piston Guards and experimenting with painting them. After a coat of black primer, I sprayed them with Mordian Blue foundation paint. I then went back around the edges of the armor with Necron Abyss foundation paint. This was a decent effect and would have been better if I had more practice with an airbrush. The blue looked nice, but I couldn't leave well enough alone. I kept thinking about how the old Legio Astorum epic minis had flames painted on them. I wasn't sure how I felt about this, but I decided to do a couple test pieces. By the way, the piston armor pieces became my test bed as they are all going to be stripped and redone anyway. I find that with every different thing I try, I get much better with the airbrush. Anyway, I know I don't want flames all over this beast, but I thought around the lower legs would be a nice nod the old days of the Legio. Thus I came up with the following ideas...

Traditional flames...


And what I like to call, Ghost flames...


Not trusting anything to chance I thought I better lay down some bronze on the trim to make sure I have an accurate comparison of the two effects.


There is some, "yuck" that is noticeable around the blue flames. This is due to the method I used to draw the flames on and will not be there in any end result. Also, I found a genius tool for airbrushing those flames on and I'd expect to see a tutorial with plenty of pics in the next week or so.

I'll also toss in a picture of the Reaver as it stands (pun intended). The upper and lower halves are not attached, merely pinned and dry fit. Here you can see the upper leg pistons have been given a coat of Mithril Silver since they seem to be hydraulics to me and should be shiny. Also, the upper arms are attached. As I mentioned above about the lower torso, this too could have been done pre-primer.


Aside from a bit of work on the smaller pieces and hand painting a million pistons, that's it for this week. Like I said, a lot of work, but not a lot to show for it! I would like to solicit opinions on the leg flames idea. Love it, hate it, take it, leave it, if you have an opinion please put it in a comment. I considered a poll, but that doesn't encourage people to explain why they think what they do, and I want to know! Personally I will tell you, I'm leaning towards the blue flames heavily.

Thanks for stopping by. Look for that flames tutorial in the near future, you can probably come up with other ways to use it besides flames. If you have any thoughts whatsoever, take a second and drop me a comment.

Sunday, September 14, 2008

Reaver Titan Pt 8 (Big Guns Never Tire)

It was a slow Titan week. I've had other distractions outside the hobby plus a work week from hell. But, things should settle down for the foreseeable future and we can plow ahead.

This week I didn't have much time, but I did manage to get the Titans' arms done. I also used a hair dryer and straightened two parts that were not quite right. I tried taking pictures of the warped pieces, but the warping was so sleight that the pictures really didn't show it anyway. Suffice to say that the hair dryer worked and now the pieces are perfect! Also, my camera was giving me fits, so I used the girlfriends for a couple of these pics... I may be using it more often as the pics seemed to come out a little better. Also, being a shorter (less pictures) post this week, the pictures are bigger, so click on them for a larger view. On to the arms!

The Laser Blaster barrels were first up on the list to be attached. There is a little widget that supports the ends of the barrels and you can see it in this next pic.


I attached the barrel which I had already glued the barrel widget to on first. Then I attached the other two barrels to the arm and the first barrel. Here you can see the complete arm including the little armor bit that covers part of the gun. This will be painted separately and glued on near the end. This armor piece was one of the two warped pieces that received the hair dryer treatment.


Next up I turned my sights on the Gatling Blaster. This has six barrels of death and another widget to support the barrels ends. I started with just two barrels across from each other and the barrel end bit.


Then, with the framework of the first two barrels in place, I added the remaining four barrels.


And a finished shot of the Gatling Blaster arm...


As I'm photographing these parts I just can't help but feel that our friend The Priest isn't doing the scale of these weapons justice. So, I dug out some Imperial Guard armor to try to convey just how big these guns are.


That Leman Russ is feeling a bit inadequate at this point. But, I think it does do a fine job of showing the scale of the guns.

That's all I achieved this week, sadly. I did trim a few miscellaneous tiny detail pieces while the epoxy was drying, but nothing worth going into. The coming week will probably see a good deal of priming and maybe even a little airbrush practice action!

On another note, I appreciate all the feedback on the trophy rack/wall of honor idea. It is still up in the air at the moment. I'm going to try and do a mock up of a wall to see if the room available inside the Titan would make it feasible or not. I was going to do this today, but my sheets of plastic seem to have been lost in the recent move. But, it's definitely still on my mind!

I would also like to fish for opinions about another decision that is coming up quickly. In some of the old Epic pictures, Titans have a banner on each weapon touting the weapons name and kills. This I plan to do in some fashion no matter what. But, some also had a banner which hung between the legs with other information on it. Would this banner be worth doing? Would it make it too busy or cluttered? Also, I'm thinking of making magnetized mounts for the banners so they can be removed during travel. Basically, a magnet in the Titan where the banner or one end of the banner chain attaches and another on each end of chain. Work vs Reward, does this sound like a worthwhile idea?

Thanks for dropping in. I'm always happy to answer questions, I'll even answer in rhyme if you request it. I'm also eager, as always, to read any other comments you might have, so leave'em if you got'em!

Monday, September 8, 2008

Reaver Titan Pt 7 (continued cleaning and assembly) Plus News!

We'll get the, "news" out of the way first. I visited my local GW store Saturday to pick up my copy of Assault on Black Reach. They had a raffle of several great prizes and several not that impressive prizes. Having won nothing in the last few raffles though, I thought it would be nice to win something, anything. And I did! I won a one year subscription to White Dwarf. The subscription is in-store pick up only, but that means that I will be eligible to purchase the limited mini this Christmas season. The limited mini for in store subscription only folks is some promotion they are starting to increase the number of in store subscriptions... whatever, I won!

Also on the news front, I was able to get a decent deal on the limited edition Forge World Reaver Titan Princeps on foot, and Imperial Navy Pilot on foot. I'm sure these guys will have tons to talk about whilst kicking back in the officers mess! The Titan base may have a spot incorporated into it allowing the Princeps to stand around beneath it looking smug. And, while I could claim the Naval pilot is flying my Marauder Destroyer, I'm sure it will simply convince me to get a Thunderbolt sometime in the future.

Now for some Titan progress!

This past week I've been continuing to clean, prep, prime, and do some assembly. The scale continues to amaze me. I'll not waste anymore time and get right into it!

Here is a shot of the head/cockpit with the Princeps removed...


And one with the crew in place (though they will be painted before being glued in).


Next is a rather large piece of the rear torso. This is the three part mega chunk of resin from Reaver Titan Pt 6. The vents are shown just below their final position. These pieces caused me some consternation because there is a spare set. Don't get me wrong, I'd rather have extra pieces than not enough!


Next up is a shot of the interior. This shot shows a completed dry fit example, and the separated pieces below. The interior panels are basically the same on both sides, but this will be fine. I have also considered leaving out one panel and putting up some sort of Trophy Rack, or Wall of Fame. If I do this I may ask my friends out there in the blogosphere who visit regularly to contribute. Maybe a SM shoulder pad from CrusherJoe to commemorate some long ago battle the Titan fought alongside his Marines on the planet Fluffnypton, for example. Or maybe some bit of kit scavenged after a battle fought against chaos and dvdhwk's Sons of Sek? It's just a thought and I'd love to hear what folks think, so leave a comment and let me know. Here is the interior...


Moving along we have the weapons, all cleaned and ready to prime and/or assemble. In some cases I'm still trying to decide which order is best. Especially on the gun barrels.

First off is the Apocalypse Missile Launcher.


Then we have the Laser Blaster. This piece also has an armor cowling that fits over the top of it. I apologize for not getting it in the pic, but it doesn't add much bulk so this is a fairly accurate representation of size.


And, last but not least, we have the Gatling Blaster... all six barrels of death dealing goodness! I've placed the upper arm on in this shot to show the size of that piece as well.


Finally, we have a shot of the Torso Armor pieces. From the viewers left to right we have the Upper Torso Armor (goes under main armor, right over the 'neck'), the Main Torso Armor, and the Lower Torso Armor (goes under the chin and to the chest). This picture is actually larger when clicked on.


I've been asked recently how many hours this is taking. I hadn't even thought to count? However, I can tell you that just the weapons pictured above took about three to four hours Sunday afternoon to trim. So I believe that I probably don't want to know! It really hasn't seemed like that long, though I know it has been many many hours of work already. It's fun and the time is just swimming by.

I've also found my digital weights scale. The following is a rundown of the weight of the items pictured above and also the legs assembly from Reaver Titan Pt 6. The first weight is ounces, the second is grams for my homies in those other parts of the world.

Missile Launcher = 8.9/252
Rear Torso = 14.1/399
Head = 3.3/93
Laser Blaster = 8.1/229
Gatling Blaster = 10.9/310
Legs = 24.2/687

I appreciate everyone who stops by and has a look. Though, I'll admit, I appreciate you even more if you leave a comment. I'm always happy answer any questions you have, either in the comments themselves, or in the next blog. Also, don't forget to tell me what you think of the Trophy Rack/Wall of Honor idea for the interior! Till next time, enjoy yourself... or enjoy someone else... your prerogative.

Tuesday, September 2, 2008

Reaver Titan Pt 6 (Legs, Logistics, and Torso)

It's been a busy week, both on and off the workbench. While it's not the most exciting part, I'm going to start with the 'logistics' topic first.

The assembly of the titan moves forward unimpeded, but finality and even painting are being put off for just a little while. I've pre-ordered The Siege of Vraks Part Two and I'm wanting to see what information it has on the Legio Astorum, The Warp Runners. My mind has been 90% made up to do that legion with only a paltry 10% still thinking of the War Gryphons (or however you spell it in 40k land). I don't want to commit to anything until I read up on The Warp Runners. For instance, I don't want to paint chevrons on the left knee just to find out that only the most cowardly princeps get that marking or some such nonsense! Likewise with a name. If there is a piece of fluff on a certain Reaver that catches my eye, I might base the titan off of that. Otherwise, there might very well be a, 'what's my name going to be' poll up before the end!

So with this in mind we move on. Certain parts of the titan can only be worked to a certain point. Any work past this point is either prohibited by work that must be done before continuing, or by the wait for The Siege of Vraks Part Two to arrive. Therefore I'm moving onwards with assembly and prep and we will come back to some finer assembly points later on down the road.

The legs are a prime example. Also they are a primed example!


The legs and their many detail parts (not pictured) have been primed and look great! I may actually do some painting on the inner mechanical parts as these shouldn't change the overall titan and are parts that I believe are probably pretty standard from titan to titan.

Many parts have been trimmed and the torso is starting to take shape. Some of these parts had some pretty big vents and a small saw was needed to get them off before a hobby knife could clean the area up. Here is a shot of the main Torso...


As you can see, very roomy for now!

The rear part of the Torso is made up of three separate parts. The two sides are huge chunks of resin, and solid!


To glue the three parts of the rear Torso together I actually applied the JB Kwik epoxy then held them onto the main Torso to make sure they set in the perfect position. Here is a shot of the three of them assembled.


Next up I cleaned the shoulders and attached them. This was another great opportunity to take advantage of the fact that the inside wall would be covered in a later step and so the drill hole from drilling and pinning could be allowed to go all the way through. However, there was no way to attach the parts first and still be able to get a drill into the titan to make the hole. So, I used the putty method explained in Reaver Titan Part 5 to line up the holes that would be pinned. Here we see the shoulders firmly attached to the main Torso.


So far dry fit is the order of the day. For every step you see there are numerous dry fits to check and double check (and often triple and quadruple check) the fit of the pieces before committing to glue/epoxy. Besides, there is some joy in just holding the parts together to see where you are heading! Here is a dry fit of the entire Torso assembly.


This does not include the upper, lower, and main armor plates. Those have been dry fitted and are very close to correct at this point. To reach parts of the interior with a paint brush, some parts must be painted un-assembled. All parts will be primed as we progress though, and the interior may see some paint in the next couple weeks. Or, I may concentrate on getting parts assembled as far as I can before painting? Tough choice! Trimming the head has been started and the cockpit interior will follow that. I will wait for the upcoming book before I paint any crew in case there is good information on uniform colors or markings. Then I expect it will be on to the weapons.

Thanks for stopping by again and checking out this project. I'm enjoying the assembly a lot, but I think the painting will bring an excitement all its own! As always, if you have any questions, comments, limericks, or anything else to share, feel free to leave a comment!

Wednesday, August 27, 2008

Reaver Titan Pt 5 (Legs Major Parts Assembly)

Well, it's been a few days and I'm happy to say the Reaver progress is coming along nicely. This blog will focus on the major (large parts) assembly. Without any further ado, let's go!

The first part is a no brainer. The titans thighs come in two large pieces. These I put together with one pin in the large piston of each leg. Not a lot of chance of weird stress angles or twisting, so I deemed one pin to be sufficient. For all these large pieces an old wire clothes hanger provides the pin material and a dremel tool and appropriate sized bit make the holes.


Next I moved my way down to the knee joint. The shape of the knee joint with all it's little ridges means that there is little chance of twisting, so once again a single pin does the job. A hole is drilled in the calf...


Then a hole for the thigh...


Then the two are joined. This is not so simple as it seems though. There was a lot of dry fitting to test and make sure that the knees were at an angle that would not interfere with later assembly. Once this angle was set (technically prior to drilling of course!) a pin is prepared and JB Kwik two part epoxy is mixed. I use a toothpick to slather the epoxy into the holes as much as possible, then on the pin itself as well. Hold the two leg parts together for a couple minutes and presto!


Next we move on to the feet, and a trick for making sure your pin-holes line up reasonably well. Just as in previous steps there is a lot of dry fitting to finalize the position I want. As a side note, whether I use the small individual foot bases I made, they have become invaluable in moving the feet around in once piece as I'm not ready to glue the toes yet. Now, to make sure that our pin-holes line up I use the following trick. Drill a hole in one of the two pieces like so...


Next, mix up some of your favorite sculpting putty. Here I've used Green Stuff. flatten a bit of the putty on the piece without a hole.


Lubricate the surface of the putty and place the piece with the hole down onto the piece with the putty being careful to press the two together in the same shape you want the final joint. Press hard. Pull them apart carefully and you will have a squished bit of putty... except where the original hole was! There you will find a little bump cast from the hole.


Stick your hobby knife through this bump and mark the spot. Now you know where to drill to get the receiving pin-hole where you want it.


Now if you are like me, you will have a little bit of play in the fit of your pinned feet before gluing. This is a good thing. After preparing both feet and legs for attaching, I get the hips handy. I placed the epoxy in the holes and on the pin as mentioned above. I then place the legs down into the feet. To make sure the angle is right, I hold the two legs together at the tops of the thighs with the hips in place. The epoxy takes a few minutes to set, but it's time well spent just holding the legs in place.


A priest jumped into this photo to show scale. I'm going to try to remember to place him around during pictures to show the scale of things.

The next step is to epoxy the hips together. This will involve no pins at this point... they will come though. I follow the same procedure of holding the legs in place with the hips as I did above, except this time it's the legs and hips being glued.

This works fine, but what about pins? This is a ball joint, a major ball joint which is susceptible to twisting stress in several directions! The answer is simple. Looking at the instructions I know there will be a cod piece and a butt piece in place that will cover the front and backs of the hips. So I mark a spot on each hip front and back and get ready to drill...


This area on the front and back are completely covered in a later step. Plus, the holes will line up because the pieces are already glued in place!


And after filling the holes with epoxy, placing the pins, and trimming the excess, we have very well pinned hips that are not likely to succumb to any twisting stress!


I used this same procedure to add another pin to the bottom of each foot. Once again, it will never be seen due to it's location and it's easy to do as the parts are already together.

This leaves us with the major assembly of the legs finished from Hips to Feet. Everything else is really just things that will be added on. The astute among you may have noticed that the upper thigh developed a ball joint to fit into the hip after the first step above. Those pics came out something awful but it is simply a circle shaped joint in the thigh. This was pinned with two pins as this is another joint that can move if only one pin was used in the center. Here is a picture of the final leg assembly as it sits on my workbench right now, as you can see the priest is still walking about blessing the feet (it's all he can reach)...


There is a little extra bend in the right leg. Not too dynamic, but better than just standing spread eagle I think. I'd like to thank you for joining me for another installment on what looks to become a 1000 part blog project. I know this was a long one, I'll try to make smaller more frequent posts in the future... this one just got away from me! And, as usual, leave me your comments, questions, criticisms, hopes, dreams, anecdotes, or whatever you've got. I have to get some use out of that fancy new comments program!


Monday, August 25, 2008

Off Topic (Fighting the disqus beast)

Sorry to clutter the blogosphere, I'm just jumping on the new DISQUS comment bandwagon and need to test it out. I had several errors trying to get it set up. Finally deleting my cookies and restarting the pc, along with saving the template as an xml sheet on my desktop then uploading instead of editing it within blogger seemed to do the trick. What a run-on sentence that was! Anyway, we'll see if I got it or not...

UPDATE: This procedure seems to have worked! I believe the trick is in the uploading of the template that disqus makes you instead of just pasting it in.

Reaver Titan Pt 4 (Legs and Bases)

Welcome back! Today is kind of a hodge-podge of an update. A little of a couple different things going on. Let's go have a look...

First off is another tip. I ran across a situation and had to use my trusty sharpie marker to bail me out again. There are some resin pieces that have a part number or other designation on them. Such as this one (note the "F" cast in the center).


There is a half cylinder bit that will cover this letter up, forever hiding the important information that is cast in the piece. So, before gluing that piece on I used the marker to replicate the information. So now even with the extra piece glued on, we can tell this part is "F", or 'front'.


Another bit of advice I have is on gluing parts together. As this project goes on I will be using a lot of epoxy. Sure, for small stuff I'll still use the Super Glue. But, for larger pieces I'll be using an epoxy called JB Quick. I love this stuff. It takes about four minutes to cure to the point that the piece is totally secure, but that gives you some working time. It also has another great feature... From about four minutes till around twenty minutes the consistency of the epoxy is such that if you have allowed some to squish out of the joint, you can carve it away with an exacto knife and it will fill any crevice automatically! Here are a couple shots of epoxy in action...


This is a shot of the first piece to get the epoxy treatment. It is an interior view of the leg armor. The bits you glue on the armor to (later) mount it on the legs are a pain. You have to apply glue then hold the piece onto the leg to ensure that the pieces are in the right position. Super Glue drys too fast, so the four minute work time is perfect here. Plus the resulting join will be stronger than the super glue could have ever hoped to be!


As you can see, some small parts are being glued already. These are all minor pieces that are required to go onto the major parts before actual assembly. I've spared you the tedium of explaining every single tiny bit that's glued on. I assure you though, that I will be sharing all the major assembly and any smaller bits that warrant special attention or are just plain cool!

Finally we move on to the dilemma of the base. I've narrowed it down to a couple of options. These are based (ha ha 3d6 pun damage to all readers) on several factors. Playability; how will it work on a game board, will it even fit? Functionality; will it hold the titan up and add at least some stability? I've decided that the pose will be fairly static. I will probably bend one knee a bit, but this thing won't be dancing a jig anytime soon. With this in mind, I bought some MDF board and did some cutting on the band saw and some sanding to bevel the edge. Thanks to my wonderful Dad for having these kind of tools laying around in his garage, even if he does live across town!

This first shot is a two base idea. One for each foot. Minimal 'foot print' (wow I'm punny indeed) but still adding some stability and preventing too much pressure ever being put on one or two toes are the main advantages here...


Then there is the full base option. This adds maximum stability at the cost of being freaking huge. The item at the bottom of the pick is a standard 12" (30cm) ruler. Also worth noting; this is a 14" diameter base, I also made a 16" in case this one doesn't allow enough leg room.


You may notice that I left the feet on the smaller 6" diameter bases in this last shot. A third idea I've had is to use both methods. I could mount the feet on the smaller individual bases, then use powerful magnets to affix those to the larger base.

I'm hoping to get to the big stuff, drilling and pinning large parts, in the next few days. So keep an eye out for another post when that's underway.

Any comments, questions, or better yet suggestions are appreciated. You can even toss in a pun if that's how you roll.
Related Posts with Thumbnails