Showing posts with label Product Review. Show all posts

Wednesday, December 19, 2012

Dreadball Unboxing!

So, I finally have something worth posting on my blog again! And, it helps that I have the time to post this evening as well.

It's going to be videos. Yes, the dulcet tones of my rambling, straight to your ear holes. Enjoy!

Part 1

Part 2

Part 3


Overall I'm very happy with the contents of the game thus far. In the bang for your buck category, it really is something. While uploading the videos I started trimming the Orx figures. They are hit and miss with the mold lines. Two had very prominent mold lines, two had very minimal mold lines. Great figures all in all. I'm looking forward to many, many days of assembly. Then maybe some painting. Then, heaven forbid, some playing!

Thanks for stopping by!

Sunday, June 26, 2011

HiTech Miniatures Product Review "Six Nil Six Factor"

This is a quick(ish) product review I did for a miniature from HiTech Miniatures out of Poland. The miniature is their 28mm ArchFather Six Nil Six Factor. The bulk of the review is a video review as I'm still trying to get better at using my camera. It's really not the camera that needs much improvement though, it's me! You can see some detailed pics of the mini on the HiTech website I've linked to above. You all have the Table Top Fix blog to blame for this review. That blog catches just about every mini from every company known to man and shares it with the blogosphere. After the video I'll post some thoughts, some of which aren't included in the video.


Enjoy!


Pros:
Fast shipping from Europe, less than a week!
Quality sculpt
They included metal pins needed to complete mini
The subject is appealing and reasonably original (my opinion)

Cons:
The checkout process on their website is not user friendly
A few more pin holes than I'd like to see for the price

Overall, I'd say that if you see something on the HiTech website you really like, give them a shot. Just understand that you may be filling a couple pin holes when you get the mini. If you have any specific questions, I'd be happy to answer them.

Back to work on the Scratch Build Titan. The shoulders are in the works right now.

Saturday, May 28, 2011

Metal vs Finecast Quality Showdown!

There has been a lot of back and forth about how much better, worse, or the same Finecast would be compared to metal minis. So I thought I'd try to post my findings in a side by side comparison with two of the same model, one metal, the other Finecast. Having a bunch of stuff still unopened finally came in handy! I also grabbed a mini that, while I don't have the exact same mini in metal, I do have a similar type mini. You'll have to watch the video to see how that one went though.

One thing I found, it is hard to compare a metal and Finecast mini. The two materials mean that they don't show up the same under a camera (or a light bulb for that matter). But I've done my best to compare the two and will give you my thoughts.

The pictures below are the Empire Captain with Hammer and Pistol. I dig the epic beards on the Empire guys.

The front side of both...


Feel free to click for a larger version...


And a shot of the backs of both...


Feel free to click for a larger version...


I'm also going to subject you to another video so you can enjoy me rambling in full audio as well in the written word...


If you have bandwidth to burn, I'd recommend the 720 version...


Over all the quality of both is great. I have no complaints on the cast quality of the new Finecast. However, I'm just not seeing the superiority of detail that others have mentioned. Could be just this sculpt though? I will say there was a guy in my GW store this morning droning on about the Finecast and how you can now see so much more detail. He pointed out that you can now see the rivets on the armor of the Emperors Champion... I've always seen the rivits on the Emperors Champion mini though, so I'm not impressed. My biggest complaint is the price increase on these. In my opinion we are getting a lighter mini and paying more. I'd like a heavier mini and my other six bucks back. Thanks.

Till next time folks, enjoy the Finecast and keep out of trouble!

Sunday, January 16, 2011

New IG Go For A Dip

Quite some time ago I bought a can of the Army Painter Quickshade product, Strong Tone. My original intent was to paint a lot of skeletons for an Undead WHFB army. I dipped a few test skellies and they turned out really good. However, that army fell to the wayside and was eventually traded away on the 
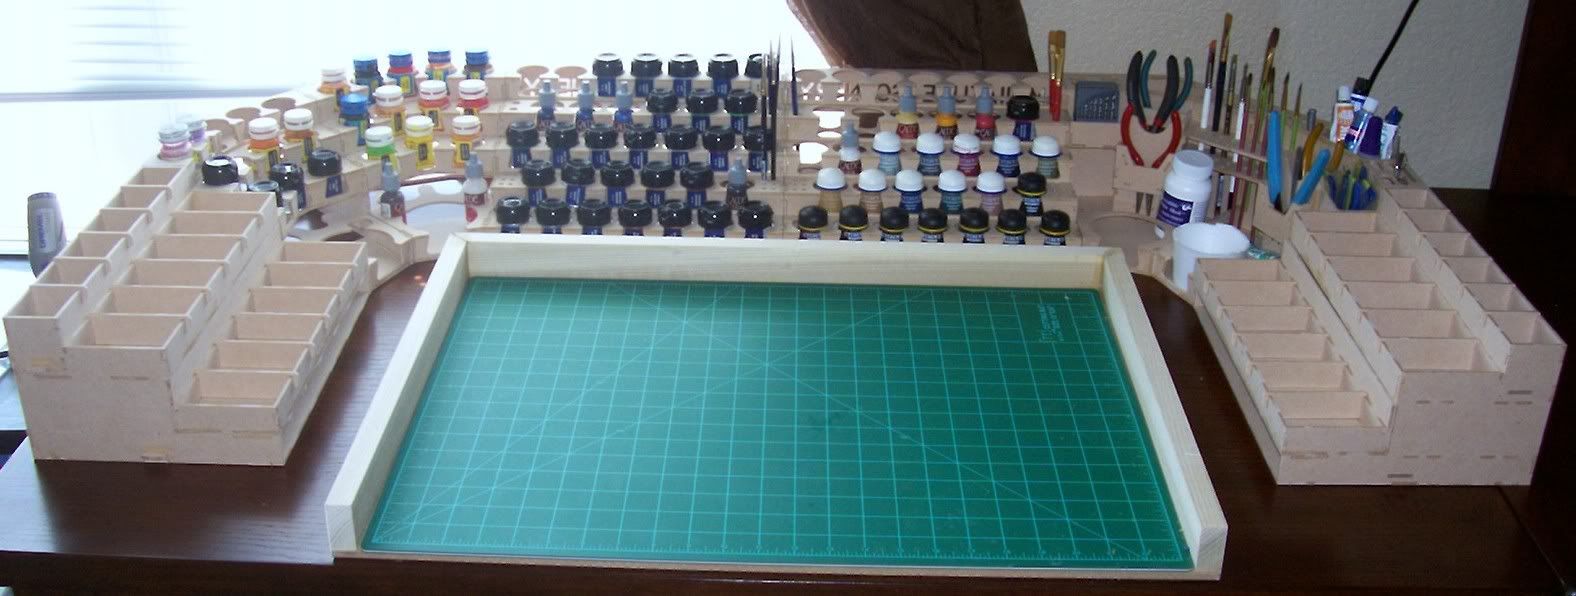
Barter Bucket over at Santa Cruz Warhammer. Since I've been wanting to work on some Imperial Guard I was cruising the interwebs and found someone mentioning that they used Quickshade on their IG. So I figured since I already have the stuff, why not give it a shot? What follows here are my steps on some test minis and the results. One other note. I've been trying to get better at taking pictures as I work, so this post is pic heavy. And, as always, you can click any picture for a larger view.
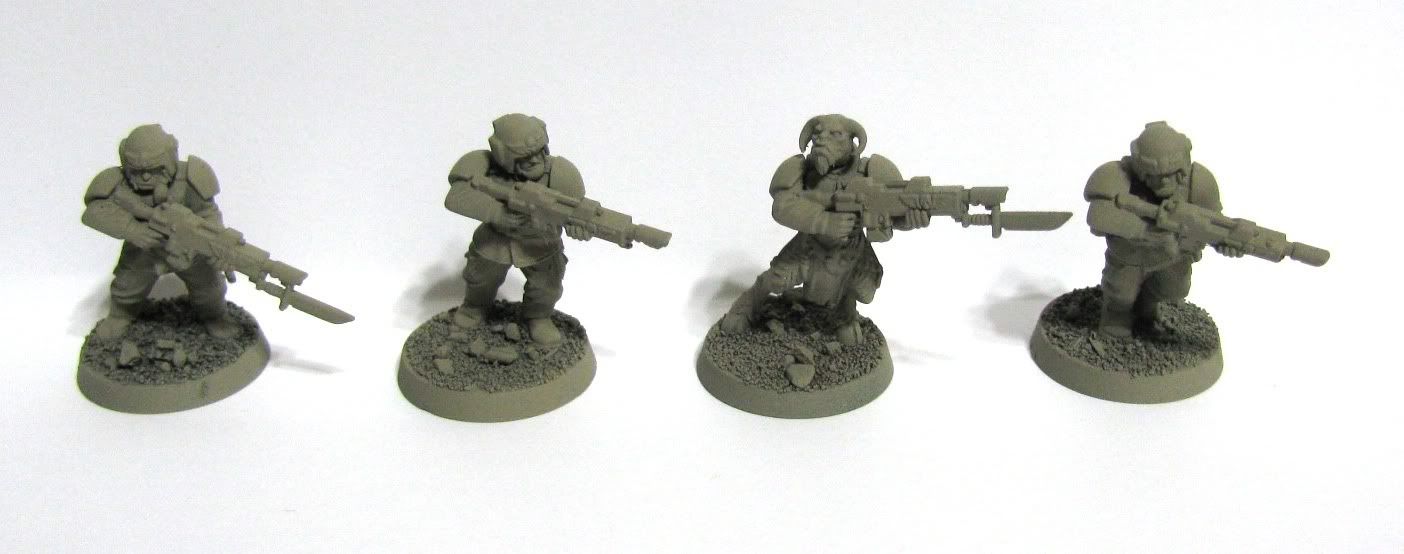
As seen in my previous post, I have been trying out some new paint from Krylon in their camouflage line. So these guys were painted first in that product for a base coat of khaki.


Then I put some Catachan green on the armor and guns. Two light coats is quick work over the khaki color...


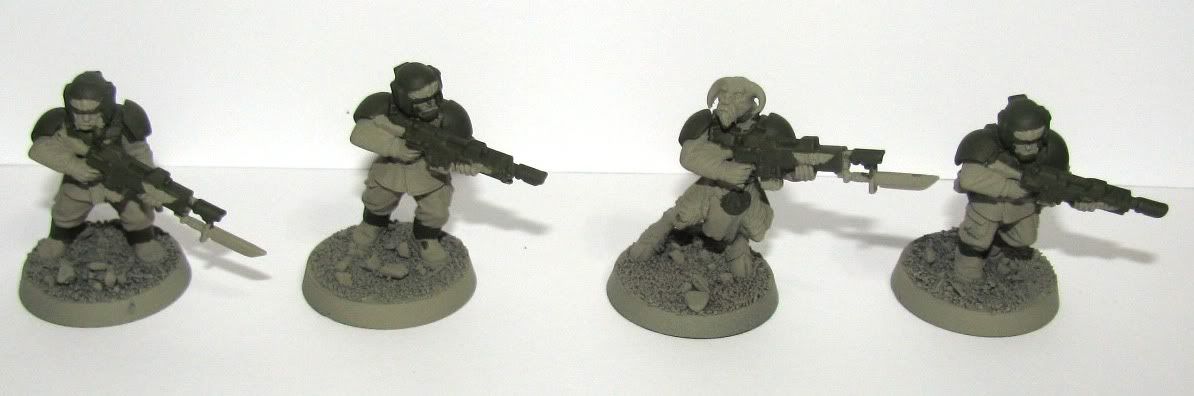
Chainmail for the gun parts, blades, and other metal bits. Shining Gold for the Aquilas, belt buckles, and a couple of details on the beastman.


High Elf Flesh for the Guardsmen flesh and Vomit Brown for the beastman flesh & fur with Bleached bone for his horns & hooves. I also painted the belts, accessories and any other leathery bits with Snakebite Leather...


While it's hard to see, I did do some very basics highlights. I edged the armor and guns with Camo Green and highlighted the khaki just a bit with actual Kommando Khaki, which is very slightly lighter than the Krylon spray. So much so, that I'm not sure the highlight really did anything. I also hit the beastman's horns and hooves with a little Skull White...


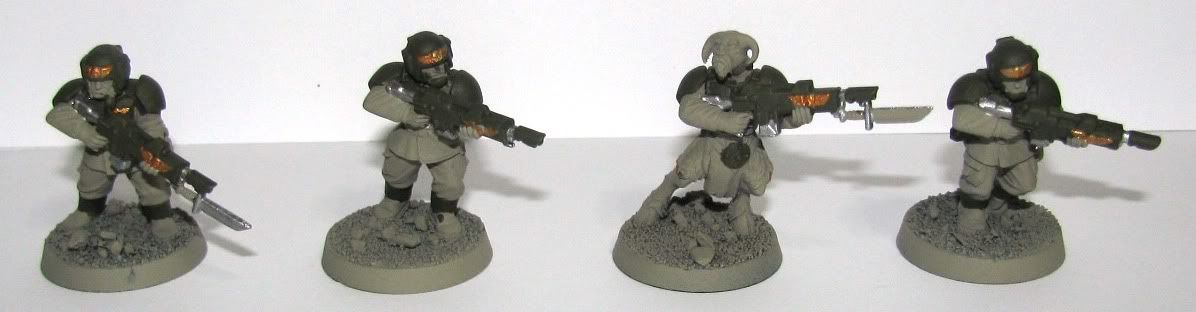
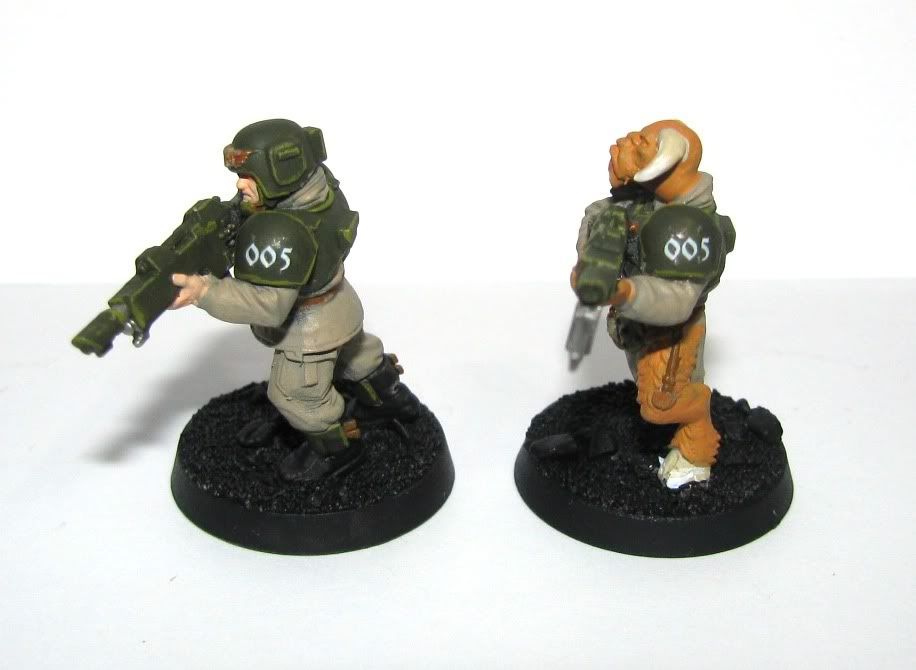
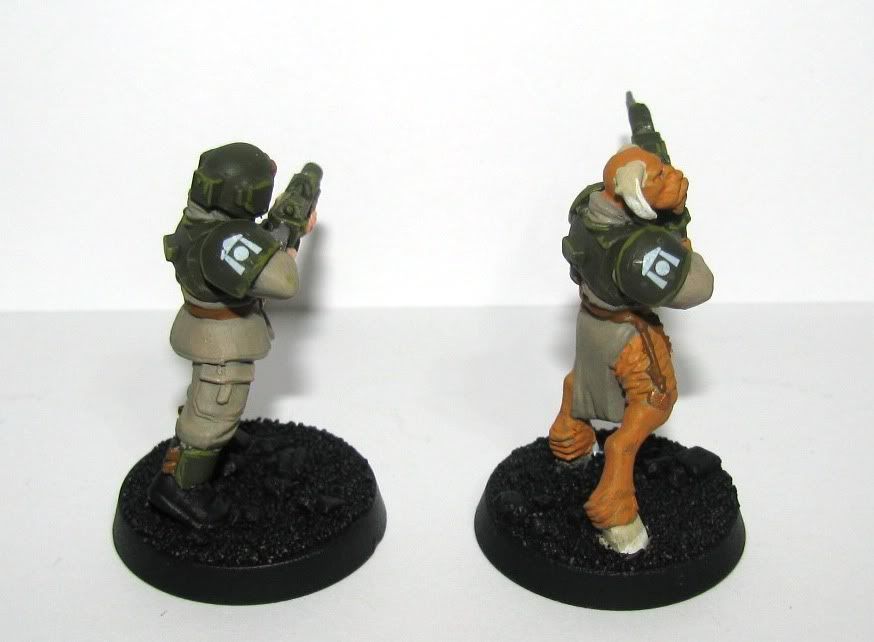
I'm terrible about squad markings and things like that. So I figured I'd use the IG decal sheet to cheat my way out of some freehand painting. I brush on 'Ardcoat first, then apply the decals using some Model Master Decal Solvent. After they are good and dry, I put another layer of 'Ardcoat on, just to make sure they are sealed down and hide any decal edges. I hit them with Testors DullCote to take the shine off before continuing...


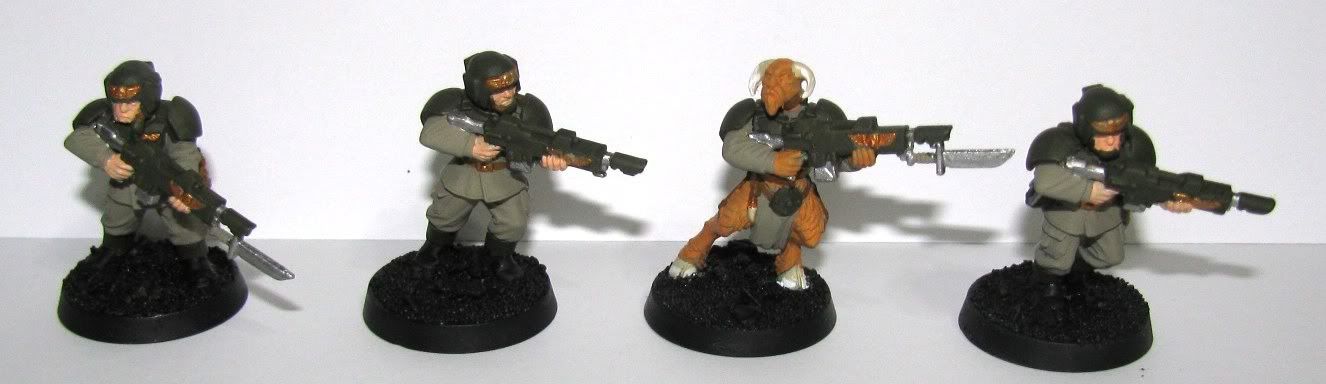
Next up is the dip. After reading lots of reviews and how-to's online, I decided that actually dipping the minis was not my best bet. So I used an old brush and slopped it on them manually. One thing I read that does seem to help is to hold the mini upside down while doing this. It really does help. As you can see below, they come out very shiny.


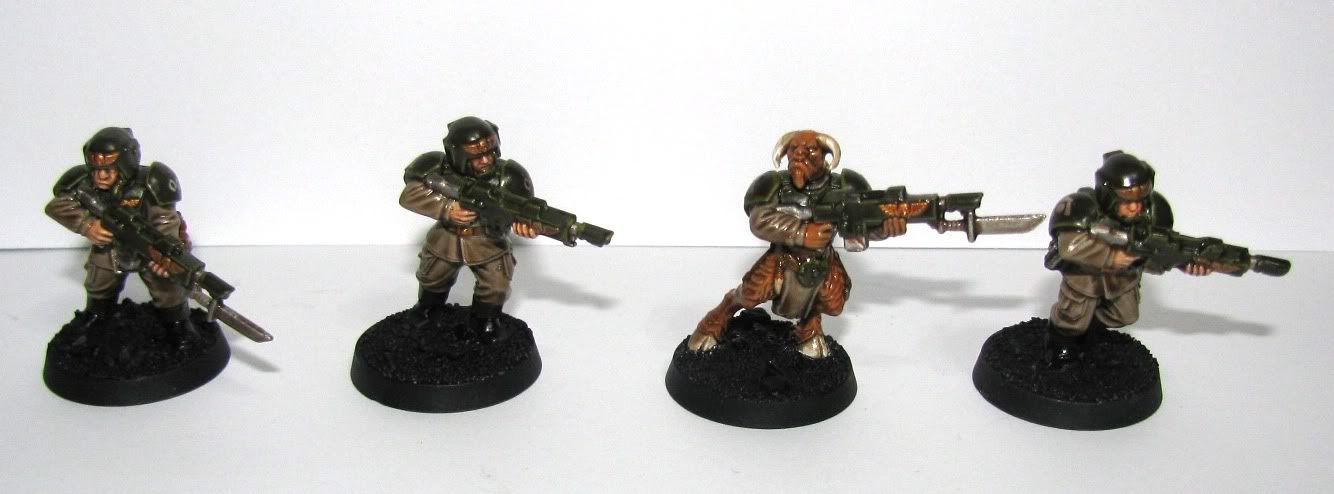
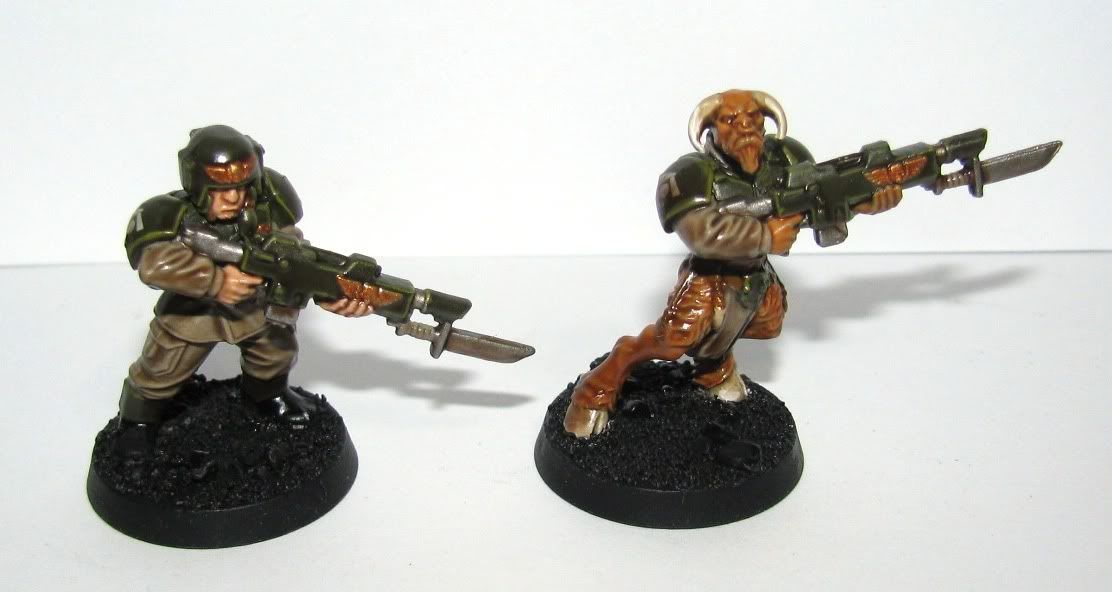
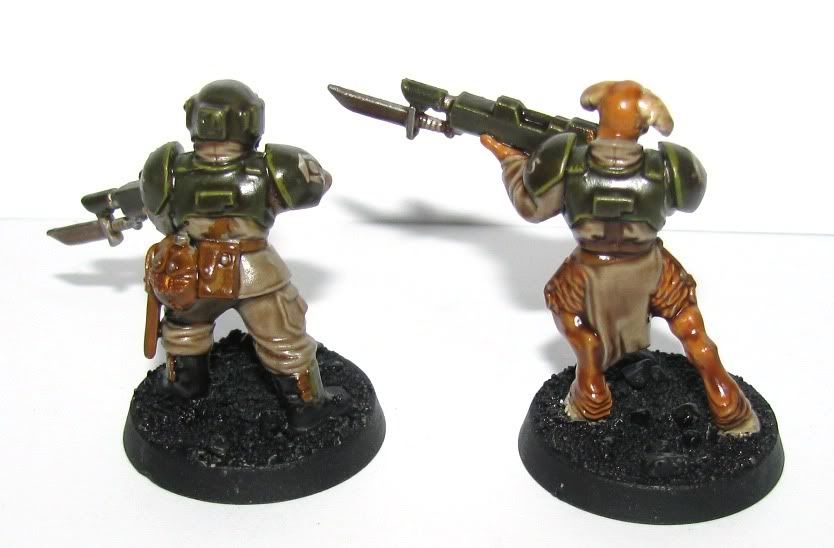
After a 24 hour dry time, the DullCote really makes them look better!


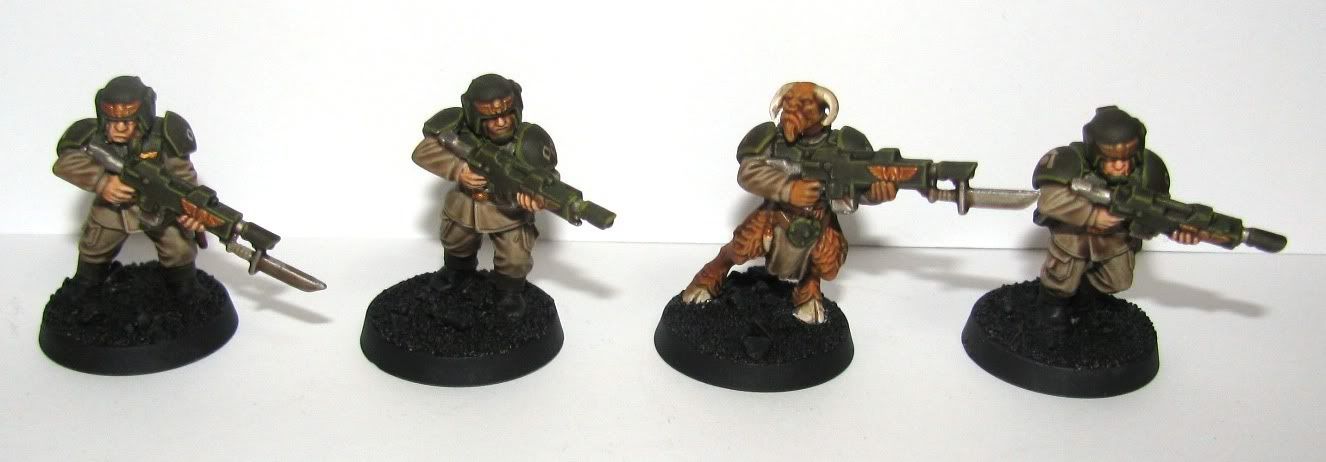
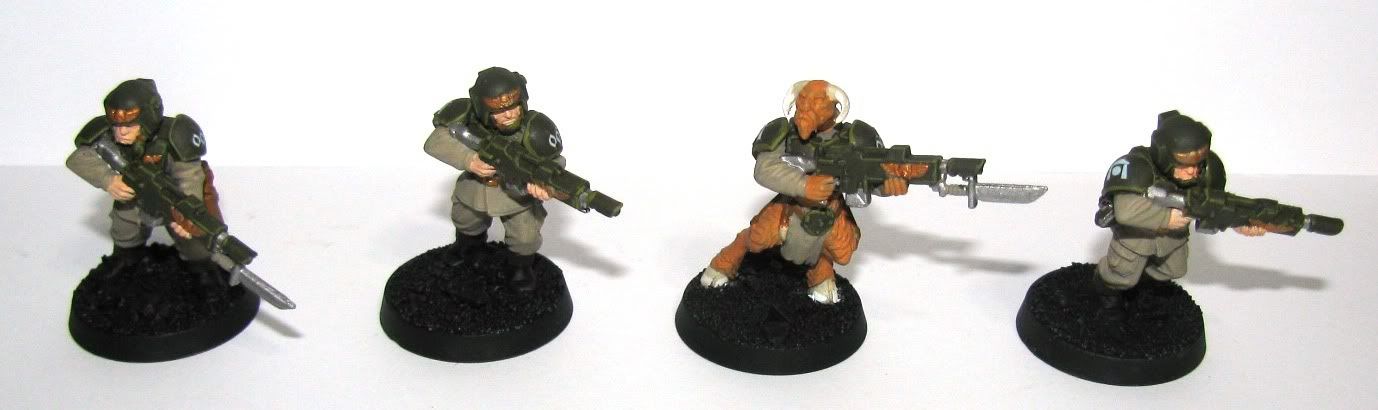
Some work on the bases and these guys are done.


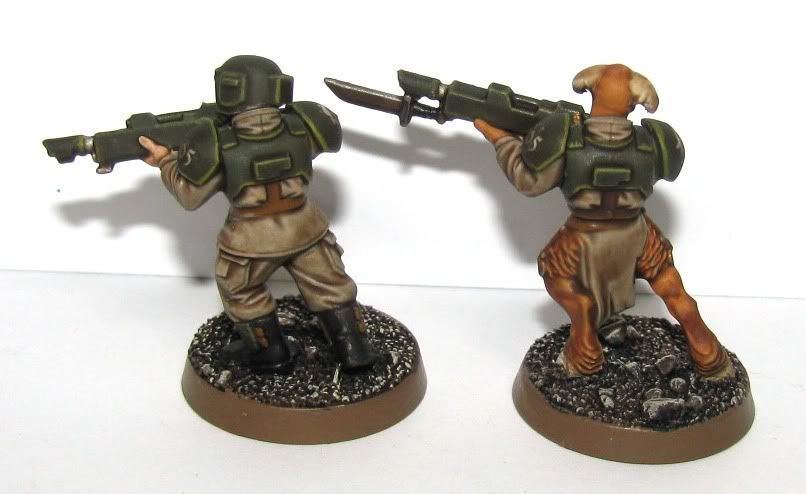
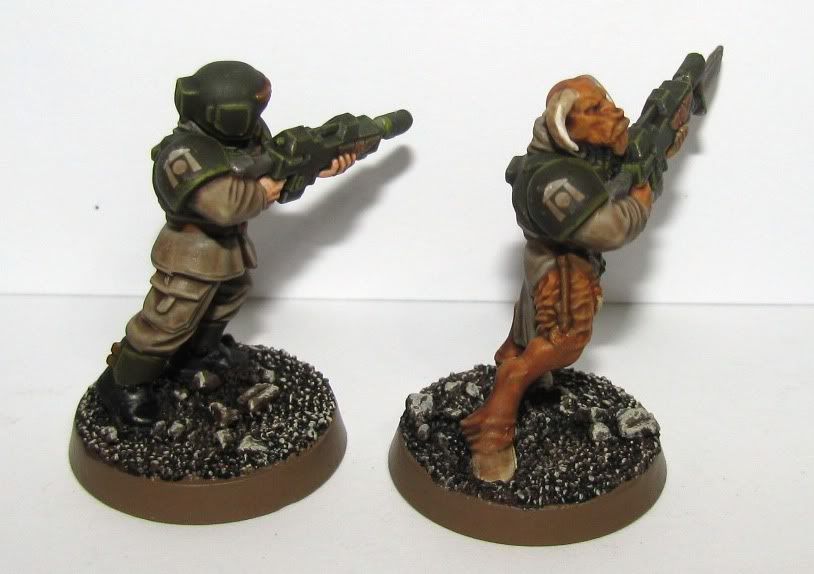
I'm not sure what happened with the bases. They don't look like my bases usually do? They might get a redo eventually. And oh crap! That beastmen has a nose ring. As you can see the Quickshade will not hide my glaring base coat faux pas, but it does shade a mini nicely.

I know some folks hate the dip, and say it's not the quality result that you get from hand painting. But I can say it makes these guys look better than the ones I hand paint and in a fraction of the time. So while I won't use it for everything, my Guard is definitely getting the Quickshade treatment.

Comments and critiques are welcome as always, I only ask that you work a wild African animal name into your comment somewhere. Something you've seen on safari perhaps...

Monday, January 10, 2011

Ah that new paint smell... Camouflage Spray Review

I could have wrote a whole blog about how ideas and what you like changes over time. And that would explain some of the direction this posts starts my hobby off in, but instead I'll give you a short synopsis before the actual blog.

I always wanted a gray, urban camo style guard army. Always. Since Rogue Trader. None of that silly army looking paint scheme for me. Then for a long while I wanted a guard army with black armor and red fatigues. Green and khaki was for sell outs with no imagination! Well, I've sold out. I've been painting outside my comfort zone, color-wise, while working my project with Admiral Drax. It turns out that traditional Guard colors are pretty nice when you get right down to it. They just look right.

So I started looking around on the interwebs and found something interesting. Some folks have been using Krylon paints to prime their minis. This is not too much of a shock (compared to GW Primer sticker shock anyway). But I found out that Krylon makes a line of paints for camouflage applications. So after being fooled by their corporate website into believing that Home Depot or Autozone carry their product, I finally found some at Ace Hardware. In all fairness, Wal-Mart does carry Krylon, but the one near me did not have the camo colors.

I picked up a couple of cans, one of khaki and one of a 'jungle green' sort of color. I have to say that I'm impressed. The paint went on smooth and coated well.

Here is a shot of some guard that had been painted, (in some cases twice) already.


If you click and view the larger image you may notice some "grainy-ness". That is my camera and post processing. The actual minis are smooth as butter.

The product claims to be ultra flat. I've put some paint on these since taking that picture and I will say that it goes on fine despite the fact that this is not, technically speaking, primer.

That worked well, so I grabbed a tank that has been in need of some love for a while and went to town on that too. I sprayed it with the khaki then taped off some pattern and hit it with the green color. The green is a little lighter than I would prefer, but it will darken up a bit when I paint the tank...


All in all I'd say, if you aren't using this paint for base coating, you're stupid. Ok, maybe that's a little extreme. But, it does seem to be really good paint so far. You can google around for other reviews by folks much more eloquent than I. You can also have a look at the product webpage. But I think if you have an army that could benefit from one of the available colors, you should consider giving it a shot!

I'll share the progress on the four guard and the tank. I might even sneak in another totally over reviewed product in the project!

Thursday, October 7, 2010

Pride (and knowing when to swallow it)

I'm not sure whether to file this blog as advice, tutorial, or product review. So let's just get on with it.

I have a friend named Pat. In fact, now that I think of it, I believe he is my oldest friend. Pat used to work at a local comics and game store many (many) moons ago. He was the manager, in fact. Probably about 24 ago years now. Pat is a great guy with only one glaring fault. He's freaking good at everything he tries to do.

So one day about five years ago, Pat is trying to help me sculpt something. Towards the end of the day he says, "here, take these extra sculpting tools and stuff, I have plenty". Very generous of him. But, in the mix of proffered supplies are these...


I was a little befuddled as I had (and still as of last week have) 20/20 vision. He assured me they were simply for magnifying things close up and that apparently I wasn't getting any younger. "Just try'em", he said. Well, to hell with that! I don't need glasses to see! I buried those suckers way way down in my pile O' tools.

Here's where the lesson comes in...

A few months ago I noticed that (despite my awesome 20/20 vision) my minis seemed to be getting farther and farther from my face as I paint. Simple enough solution, move hand toward face... but... but... what the crap!

So that day, the great bell tolled and my pride died in the heat of painting battle. I tried the glasses. Freakin Pat was right again! The glasses allow me to get the subject closer and still keep it in focus. So now I can be found slipping the 'reading' glasses on when I'm painting or sculpting anything detailed.

Now I know a lot of folks wear prescription glasses. This article may not mean much to you as you are quite used to wearing glasses. But, while I've seen a million blogs about paint brushes, paints, techniques, sculpting, blending, washing, inking, and the use of electric fences in Suburbia (thanks Suneokun), I've not seen anyone mention the fact that at some point you have to make sure you can get the mini where you can see it to do any of it. I think it's kind of assumed, but I can tell you as a person who doesn't wear glasses, I'd have never thought of it if someone hadn't shared the knowledge with me.

If you've made it this far, bless your heart. I try not to get too wordy, but I'm not always successful. I'll have more picture-y blogs coming soon. I've even made some decent progress on the Marauder Destroyer!

In closing I'd like to thank you for stopping by. And I'd like to thank Pat for the great advice that it only took me about five years to follow. If anyone is interested, you can visit Pat's project blog here. He is now a full time sculptor and he does take commissions!

Feel free to drop any comments or complaints you may have in the appropriate area.

Wednesday, February 3, 2010

Marauder Destroyer Pt. 3 (The Bends and Acrylic Rods)

A quick update on the progress of the Marauder Destroyer and an impromptu product review as a bonus!

As with any other resin kit from any manufacturer in the world, the MD suffers from its share of warpage. So I thought I'd share my technique for taking the bends out.

I start with boiling a pot of water on the stove. Once it's boiling I back the heat down from a high setting to a medium setting. This should let the water get down to just below a boil temperature-wise. I keep a bowl of cool water on hand as well, to cool the parts down once I get the shape I want. I skipped pictures of that stuff as I'm sure you know what a stove, pot, water, and a bowl look like.

Instead I thought I'd show you the kinds of things I had to straighten out. The thicker pieces, like this Tail Plane, I hold submersed or partially submersed (depending on how much of the part is affected) for about 20-25 seconds.


For thinner bits like these Flaps and Bomb Bay Doors 10 seconds or less should do.


For even thinner bits, you have to be careful and probably use a 5 second or shorter dip in the hot water...


For the thinnest of parts, like the Canopy Frame, I literally just dip and remove. This still gets the parts as soft as a wet noodle so extra care must be taken with parts this thin.


Whenever possible, it's also a good idea to have the piece that the part will mate up with on hand. This insures you get the shape you really need. In this case I put the part in it's position over the cockpit to make sure it fit correctly.


These are not all the parts I had to straighten out a bit, just examples of different types and sizes of parts. With this stage out of the way it will be some priming and painting and some parts assembly next.

For the product review, I'd like to share with you my experience in finding a suitable mount to fly this bird when it's complete. I found acrylic rods for sale over at Dragon Forge Design. The site lists a six inch acrylic rod with a resin bit to assist in mounting the rod to the flyer of your choice. The product page can be seen here. I knew I wanted my Marauder to fly a little higher than 6 inches, in fact 12 inches is more what I wanted. I emailed Jeff at Dragon Forge Design and he was able to custom cut me a 12" acrylic rod with no problems. Not knowing much about acrylic rods and such I was a little worried that the weight of the Marauder might be a little much for a 1/2" diamter rod. Nothing could be further from the truth. I think you could just about put an actual airplane on this rod and not bend it.


I would definitely recommend Dragon Forge Design for anyone looking for a way to raise up their flyer model. He also carries a large assortment of custom bases and such. In my opinion the products are priced reasonably and the customer service is excellent!

Wednesday, January 27, 2010

WHx2 (What's on my porch?)

Quick break from the Marauder... I know, we just got started, but this is important stuff!

The parcel delivery person rang my bell and left a box on my porch...


Well, the insides looked packed nicely. (Spoiler: I won't be able to get it packed that nicely when I'm done rummaging thought it.)


Not a bad start, we have the eight Hellstrike missiles I'll need soon for the Marauder Destroyer!


Next I find an Inquisitor Rex and retinue set. He's super cool looking and maybe will inspire me to dig out and repaint some Daemon Hunter stuff!


But wait, there's something hiding beneath all this (really it's not that hard to see, but I'm going for drama here)!


Yep, two Mars Pattern Warhound bodies! Here is a shot of the bits within their protective bags.


And for weapons? Eventually there will be a variety that are interchangeable via magnets, but for now, five Turbo Lasers...


I know, five is too many for two Warhounds. I plan to modify one to go on the carapace mount of my Reaver Titan.

I'm happy to say that after going through each bag of parts, the quality is amazing. Nothing like the problems I had with the Marauder Destroyer upon arrival. All parts are cast well with minimal air bubbles. Some minor, but expected, warpage that will easily be straightened out during assembly. I'm sure tiny flaws may come to light during wash when I handle each piece more extensively. But as of now, I was only able to find one tiny fault as shown below.


Not bad for two large kits worth of parts! The tiny ball joint has been mended using my nemesis, Super Glue. Overall, I'm extremely pleased with the kits. That and the super fast shipping. It was maybe three days in process and post to Texas, USA.

I'm excited to start on these Warhounds, but I'm not going to rush the Marauder to get to them. Well... maybe a little. I'm thinking they will be a simultaneous build, but honestly once I get started that idea may change. Of course, at some point down the road I'll be pestering Ron over at ++ From the Warp ++ to work me up some of his amazing banners like the banners for my Reaver Titan he did.

I'm always looking for ideas and input from you folks out there in internet-land so feel free to drop me a comment.

Thursday, January 21, 2010

Marauder Destroyer Pt. 1

Just as I warned, the work on the Marauder Destroyer has begun...

This is actually a kit I bought about three years ago. I think it would have got done soon after arriving except it had some pieces that had to be resent by our friends at Forge World. I'll show you the offenders below. This gave me time to pursue other projects and here I am finally getting to this awesome kit. Now, let me quantify the term, "awesome kit". It's a kit that becomes an awesome model, not necessarily one of awesome quality. This kit came with a lot of broken pieces. Some were fixable, some rebuild-able, and some that had been ground into a fine powder in shipping to the point that I thought at first they were just missing until closer inspection of the debris. This is not my normal experience with Forge World and I think a lot of the problems can be attributed to shipping, the fine details, and thin bits included in this kit. I will say that Forge World made the process of getting replacement parts very easy and I can't say enough about their customer service.

So lets have a look at the major bits!


And here are the parts that had to be re-shipped (Please note as I mentioned above that Forge World provided excellent customer service and was very helpful in getting this parts replaced). These are the parts there were battered beyond recognition upon original arrival.


Here is another piece of damage I didn't pick up on until trimming the parts.


Compared to the opposite sides' shape...


So I used the good side to find the shape I needed for a plasticard repair job.


With the piece secured with some super glue (I still hate the stuff), it's ready for some putty and sanding that will come at a later stage...


Some seriously large channels from the resin pour meant I had to call in the big guns for a couple parts. (Don't breath in resin dust when sawing or sanding!)


Then it was into a bath of Simple Green and a bit of dish washing liquid. A large container for the bigger parts and a cup for the fiddly bits!


And there the parts remain. I'll be rinsing and drying them shortly. I've departed from my usual order of things in that I've trimmed the pieces before the wash. I figured why not wash away most of the debris and junk from trimming instead of washing then creating a whole new mess. There will still be some parts that will need a last minute trim or tweak, and I have magnetic plans for the landing gear yet to implement so I know that some pieces will need another rinse. But, doing it this way, most parts have suffered all the handling they will need prior to wash.

Now, here is what I need from you folks out in the blogosphere. Ideas for a base on which to have this beast flying. If you've built a flyer and found something that makes a decent base, tell me. If you have seen a good solution used by someone else, let me know. If all else fails I'll have to manufacture something myself, but I'd hate to miss out on a ready made solution or product if one is out there. Also, thanks to all you guys who voted on the recent poll. It's still up for a day or two but I think the victory of the twin Warhounds is a foregone conclusion.

Any thoughts, suggestions, critiques, and random musings are welcome. I always like to hear from you guys!

Monday, November 16, 2009

BRIEGEL Pt 1 "Unboxing"

A month or two back I acquired a resin model kit from Kallamity.com. The site, and the models/art found therein, are the work of Luca Zampriolo from Italy. I would encourage anyone interested in mecha or any kind of mechanical art to check out his website. In particular there are picture galleries of some of his work being designed as well as painted. If you pay attention to the painting in progress galleries, there are non verbal hints and tips to be ferreted out. He has quite an interesting style that I've become quite keen on.

The kit I purchased was the BRIEGEL with optional 'Walrus Units'. The Walrus Units are simply big guns that can be used to replace the arms, though I have other ideas I might try using them for! This kit is billed as a 1/35 scale model and features a cockpit that can be modeled to open and close upon completion. This scale lines up reasonably well with my Warhammer 40k addiction so the completed model may at least make for interesting scenery or a mysterious objective when finished. On to the unboxing...

The kit arrived reasonably quickly from Italy, less than a week in shipping, and in great condition. The box was packed tight, but it was an efficient kind of tight, not overcrowded. Little things like the picture on the box and the stamp on the end proclaiming the print number of this particular kit add to the professionalism Luca shows with this kit.


Inside the box the parts are laid out in individual bags with labels as to what the parts in that bag will be used to build. Some of these bags also contain smaller bags within to hold smaller parts or parts of a particular sub assembly. This is similar to the way ForgeWorld lays out some of their larger kits but with the addition of a small piece of paper as a label, it comes off as more organized and feels more put together.


Besides the parts there is a packet of instructions and other goodies. There is the manual proper, a small sheet of decals, a snazzy and unique business card, a custom postcard with the numbered and signed edition info on it, a small card of information and products, and three pins of the sort you can pin to a shirt or hat. I know it's silly, but it's the little things that really make me smile, maybe because they're so unexpected. The pins, the business card... will I ever need them? No, but he went through the trouble to put them in there anyway. The decals are of a high quality including whites, not just something that was done on someones HP printer. I don't recall getting decals with other companies resin kits in the past...


I've looked through the instructions and handled the resin a bit already. The instructions are thorough and easy to read, despite being designed by a person whose first language is not English. On a scale of one to ten I'd put the usability of these instructions at an easy nine. For reference I'd put the Reaver Titan instructions around a four at best. There is even a line drawing of the mecha on the last page which you can photocopy and color to try out color schemes before you begin painting, very thoughtful. On to resin quality. The overall quality is good, but there are some parts that have quite a few pinholes in them. These are easy enough to fill but are, so far, the only real complaint I have with the kit. I will say there are no warped or miscast parts to be found though, that's a plus. Another note on this kit; the kit is positionable. The arms and legs have hinge points which require brass rod to be used in the hinge. While the instructions are very clear on what size rod and what length go where, the rod material is not supplied. It just seems like it would be that much better if the kit had the rods included and it wouldn't cost that much extra to add them.

Overall I'm pleased with the kit and excited to start building it. Unlike the Reaver Titan project, this will not be a straight through all in one go project. I will take breaks and work on other things as needed to not go ape-shit crazy like I nearly did working on the Reaver. So, look for updates in the future. Cleaning and assembly could start very soon!

Monday, March 16, 2009

Product Review: Miniature Scenery Paint Racks

I have been eyeballing the products over at Miniature Scenery for a while now. Since I'm getting my work space organized, I thought I'd go ahead and pull the trigger. And, since I planned to do a review here on the blog, I decided to get the Master Workstation Combo... to provide the best information to my readers of course!

First off, the purchase itself. The company's website has a lot of information to try and explain their international shipping. They even have charts and graphs that would make a mathematics major blush. However, the gist of it is, the price they charge for international orders is higher than for Australian orders but the shipping is subsidized into the price. There is also weight and method of shipment to take into account. I'd say, if you're interested, drop some stuff in their online basket and see what you get with shipping. For this purchase, the fastest shipping was actually the cheapest and because of the subsidy ended up crediting me about $4 off the price. With the purchase out of the way, let's continue to customer service and shipping time. I purposefully emailed the orders department and inquired when my purchase might ship. Within 12 hours I had a response explaining that Monday was a holiday in Oz and there would be no post, but that it would ship out Tuesday. I was promptly sent a shipped notice when the items were in the post which included a tracking number (note: not all shipping methods include tracking). Friday early afternoon, and my product had arrived here in Texas. Not a bad three days to make it from Australia to Texas!

The products arrived in a smaller box than I had envisioned, but all was accounted for and packed neatly within.

Each 'module' of the paints and tool racks is individually packaged.


The modules are, of course, supplied in kit form on sheets of 3mm thick MDF approximately A4 in size.


Assembly is not too complicated, nothing an experienced gamer/modeler can't handle. The instructions are simple but to the point. It's not rocket science and it doesn't pretend to be. The only thing I would caution is to make sure you know exactly what you are cutting out. Sometimes scrap can look like a part and vice versa. I thankfully had no flubbs, but I did very carefully cut and trim a couple pieces of scrap thinking it looked like something important. Cutting is easy to do with clippers. The pieces of "sprue" need to be trimmed off the parts after they are removed form the frames. This can be done with a hobby knife, files, or as I found out, a belt sander! What a time saver that was. Once the pieces are cut out, you can assemble them using whatever glue you prefer for wood work. I personally use a fast setting wood glue I found at my local DIY store. It sets reasonably fast and is stronger than wood when it's cured. I'm not going to go into the assembly of the modules as I believe that anyone who has even beginner level experience with model building will be able to accomplish this.

The finished product is sturdy. Much more sturdy than you would believe when you hold one of the parts sheets. Everything fit together perfectly and not once did I have to pry, bend, or trim any part to go where it was meant to. Here are some shots of the finished product.

Some corner paint modules details...

The straight paint racks...

The corner tool modules...

And a shot of one of the parts holder modules. Note the opening drawer and removable dividers...


Overall I'm very satisfied with this product and the company that provided it. The customer service was excellent. The product lives up to all the manufacturers hype. The modular design means you can place each piece where ever you feel comfortable. All eight pieces are completely interchangeable (the corners in my layout are actually two pieces each). I don't think the price is cheap, but I do believe it is fair for what you get. It's definitely more of a convenience than a necessity, but I'd say if you have some tax return money or birthday cash laying around... or if you just want to get your hobby more organized, go for it!

Related Posts with Thumbnails